
")
With 1.94 billion monthly active users, Facebook continues to be the dominate social media platform. No matter your target demographic, you can find them posting, sharing and commenting on Facebook, so it makes sense that you should be spending at least some of your advertising dollars there.
In this series, we'll teach you how to use Facebook Ads Manager, the platform's advertising portal, and provide tips and advice for how to navigate this new marketing landscape.
Now that you understand the basics of Facebook Ads Manager and what it can do, it's time to put together a campaign. No matter your budget, you can set up highly targeted campaigns that go after the results you want.
Here's how to create a basic Facebook campaign with Ads Manager.
Last Time
As we discussed in last week's article, Facebook helps you establish campaigns by breaking down marketing objectives and ad types. Within the three different objectives — Awareness, Consideration and Conversion — there are 12 different ads you can create.
1. App Engagement
2. App Installs
3. Brand Awareness
4. Clicks to Website
5. Event
6. Lead Generation
7. Local Awareness
8. Offer Claims
9. Page Likes
10. Post Engagement
11. Store Visits
12. Website Conversions
Each ad helps deliver a specific objective. If you want to encourage people to like your Facebook page, then you would choose Page Likes. If you want to spread the word about an upcoming event, then you would go with the Events ad.
Step 1: Choose Your Objective and Ad
When you open Ads Manager to start a new campaign, Facebook first asks you what you want your objective to be.
Only you can choose which is the best objective for your business, but start by asking what it is you want from Facebook in the long run. Do you want more people to sign up for newsletters on your website? Do you want to encourage store visits? How about using Facebook to offer deals and discounts?
Building up to these goals takes time and awareness. Although your ads can go to people who haven't liked your page, remember that they will be less likely to sign up for your newsletters if they don't know who you are at all. The more awareness your brand has, the more effective your bigger campaigns will be. If you have less than 1,000 likes on your page, spend some ad dollars building up awareness first.
Step 2: Set Up Your Ad Account
Once you choose your objective, Facebook will prompt you to set up an ad account by setting your currency, location and time zone. Doing this will help Facebook track your progress in real time and deliver accurate billing cycles.
You can also use the Advanced Options to add an account name. Facebook's default is to use your personal profile's name, but if you run multiple Facebook pages (maybe you also run the Facebook page of a book club or church group), the consider changing the Account Name to your business's name. This will help you keep your accounts organized should you choose to do ad campaigns for different pages.
Step 3: Create Your Audience
Now you're ready to set your audience, placement, budget and schedule.
With Ads Manager, Facebook allows advertisers to create groups of people it calls audiences — groups of users who share similar traits or behaviors. There are tons of different audiences to create, and you can create as many of them as you want. In general, there are two types of audiences: Custom Audiences and Targeted Audiences.
Custom Audiences allow you to target people based on their email addresses. For example, if you have an e-newsletter, you can upload a list of your subscribers and advertise to them. Facebook will cross your list of email addresses with its user database, match accounts with email addresses and show your ads to those matching accounts. This is a great way to send ads directly to people who already have interest in your business.
Targeted Audiences lets you use all the information Facebook users post in their profiles to create specific lists. You can set simple demographics, such as age and gender, as well as more finely targeted demographics. Some of the targeting groups include:
- Location: Target people who live in your business's town as well as the surrounding areas.
- Job Title: Want to work more closely with interior designers or contractors? You can target people with specific job titles to deliver specific business-to-business messages.
- Life Event: People love to share news about big events, such as engagements and new home buys. Show your ad to people who have just bought a home and may be in need of new lighting or furniture.
On the right-hand side of the screen, you'll see a red, green and yellow monitor. This tells you your Audience Size based on the selections you've made. The goal is to keep the pointed line in the green, but leaning toward specific. The more specific your audience, the better reaction you'll more than likely receive.
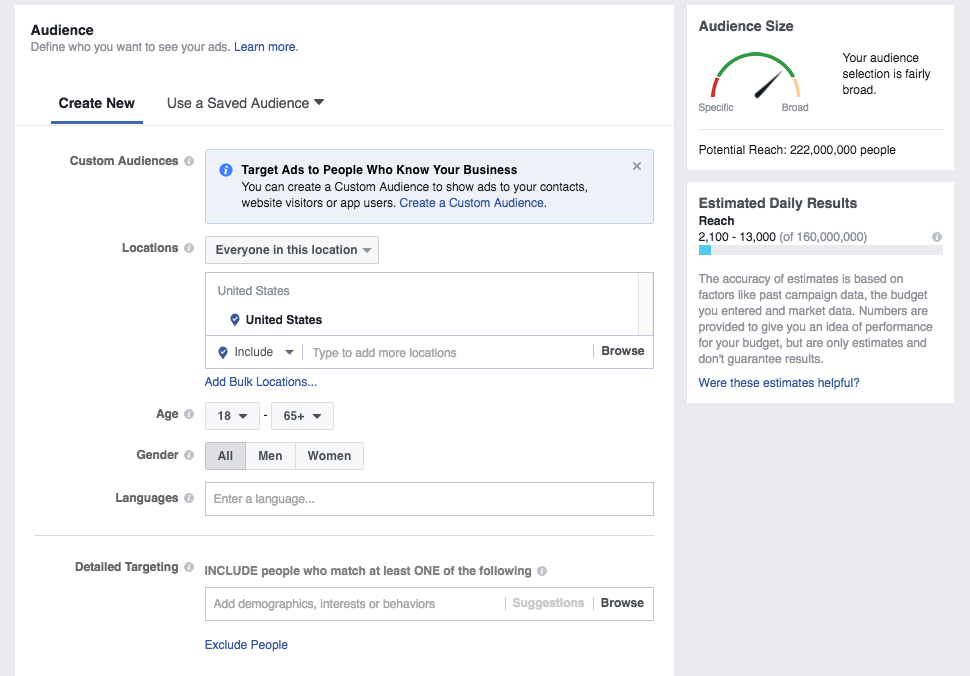
There's a lot to discuss with Facebook's audience capabilities, so we'll go into details in the next article.
In the Placements category, you can either choose Automatic Placements or Edit Placements. With Automatic Placements (which Facebook recommends), Facebook will do the heavy lifting and place your ad where it is most likely to succeed across all its platforms, including its desktop and mobile versions as well as Instagram. Doing so will help get you the best results possible at the lowest price.
With Edit Placements, you will set this up yourself. For new users, it's best to let Facebook place your ads.
Finally, you'll set your budget and schedule. The lowest you can really go is $5 per day — depending on how many days you advertise, that price will vary. Some days, you'll spend a little more, and some days you won't hit that $5 mark. The more money you spend, the more people Facebook will show your ad to out of that audience you specified. On average though, you'll spend the $5. For one-off ads, you won't be able to customize your ad's delivery schedule, but as you spend more time running longer campaigns, these options will be available.
Step 4: Review and Place Order
In the last step, you'll go over everything and set up the text and images for your ad.
For an Awareness ad, you'll need to:
- Choose the format of your ad (carousel, video or just one image)
- Fill in the text, headlines and descriptions for each ad format.
- Specify links to specific pages
You can preview what your ad will look like under Ad Preview. Use this to make sure the text and hyperlinks are where you want them. You can scroll through all the previews to see how Facebook will display your ads on multiple platforms. Some previews will be unavailable (if you're not using video, then there won't be a video ad format), but the ones that are will fill in.
Once you're ready place your order and get ready to see results!
Clearly, there are a lot of moving parts to making a successful Facebook campaign. Stay tuned as we tackle other parts of the process in a more in-depth fashion.
Next week, we'll discuss Facebook audiences and how to set them up.
Previous Installments


